
When running scripts in Azure Automation, authentication is often the trickiest part. Your runbooks might need to connect to Azure services, Microsoft Graph, or other APIs — and that means handling credentials securely. In this guide, Use Azure Managed Identity with Azure Automation PowerShell, we’ll focus specifically on User-assigned Managed Identity (UAMI), a secure, reusable, and passwordless way to authenticate your automation scripts without managing secrets or dealing with service principal key rotation.
Table of contents
While you can use App Registrations with secrets or System-assigned Managed Identities (SAMI), many enterprise scenarios benefit from User-assigned Managed Identities (UAMI). UAMI offers flexibility, reusability, and security — making it ideal for shared automation environments.
In this post, we’ll cover:
- What a User-assigned Managed Identity is
- Why you might choose UAMI over SAMI or App Registration with secrets
- How to create and assign a UAMI
- How to use it in an Azure Automation PowerShell runbook
- Common pitfalls and best practices
What is a User-assigned Managed Identity?
A User-assigned Managed Identity is an Azure resource that has its own identity in Microsoft Entra ID (Azure AD). Unlike a System-assigned MI, which is tied to a single resource’s lifecycle, a UAMI:
- Exists independently of any one resource
- Can be assigned to multiple resources (Automation accounts, VMs, Functions, etc.)
- Retains its permissions even if one resource is deleted
This makes it perfect when:
- You need consistent credentials across multiple Automation accounts
- You want to separate identity lifecycle from the Automation account’s lifecycle
- You’re running automation for multiple subscriptions or tenants
Why UAMI Instead of App Registration with Secrets?
Before Managed Identity, the common approach was:
- Create an App Registration in Entra ID
- Create a client secret
- Store it securely (e.g., in Key Vault or Automation variables)
- Rotate it regularly
While functional, this approach has several issues:
- Secret rotation overhead — secrets expire and must be updated everywhere
- Storage complexity — secrets must be stored and retrieved securely
- Security risk — accidental exposure in logs or code
With UAMI, you get:
- Passwordless authentication — no secrets to manage
- Automatic credential rotation — Azure handles it
- Centralized permissions — one identity to manage across services
- Resource reusability — same identity can be attached to multiple resources
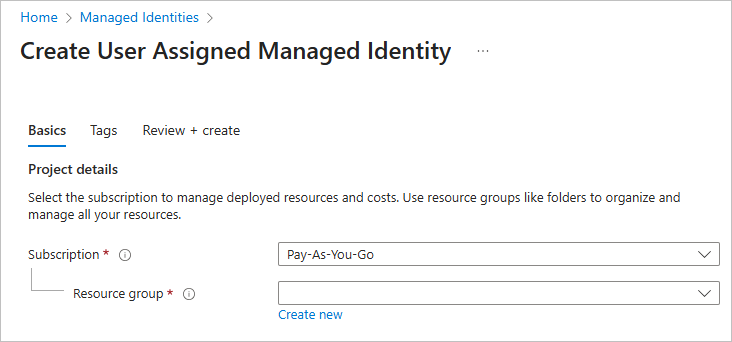
Step 1: Create a User-assigned Managed Identity
- In the Azure portal, search for Managed Identities.
- Click Create.
- Choose your Subscription and Resource Group.
- Enter a Name (e.g.,
AutomationUAMI). - Select a Region — ideally the same as your Automation account.
- Click Review + Create, then Create.
Step 2: Assign Permissions to the UAMI
UAMI starts with no permissions. You must grant access based on what your runbook needs.
Example: Assign Contributor role at the Resource Group level:
- Go to the resource group or subscription you want to manage.
- Select Access control (IAM) → Add role assignment.
- Select the role (
Contributor,Reader,Key Vault Secrets User, etc.). - On the Members tab, choose Managed identity → User-assigned managed identity.
- Select your UAMI and click Review + Assign.

If using Microsoft Graph, you must:
- Go to Entra ID → Enterprise Applications.
- Find your UAMI by name.
- Assign API permissions (e.g.,
User.Read.Allfor reading users). - Grant Admin consent.
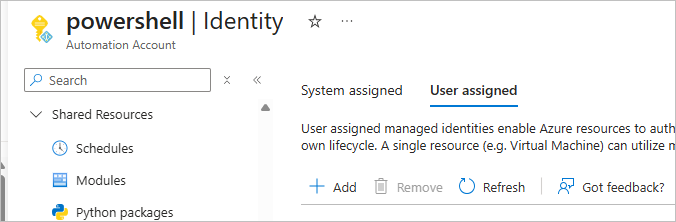
Step 3: Assign the UAMI to Your Automation Account
- Open your Automation Account in Azure.
- In the left menu, click Identity.
- Under User-assigned, click + Add.
- Select your UAMI and click Add.
Your Automation account now has access to authenticate as that UAMI.
Step 4: Authenticate with UAMI in PowerShell
When running inside Azure Automation, you can connect using the UAMI’s Client ID.
Example: Connect to Azure Resource Manager and restart a Web app
# Log in with managed identity (inside VM, App Service, etc.)
$subscriptionID="SUBID"
Connect-AzAccount -Identity -AccountId "UAMICLIENTID" -Subscription "SUBID"
Set-AzContext -Subscription $subscriptionID
# Restart a Web App
Restart-AzWebApp -ResourceGroupName "rgname" -Name "wepappname"
Best Practices
- Use least privilege RBAC — give the UAMI only the permissions needed.
- Use separate UAMIs for different environments (e.g., Dev, Test, Prod).
- Keep a naming convention for UAMIs to track usage.
- Prefer UAMI when multiple automation jobs need to share the same identity.
Conclusion
A User-assigned Managed Identity offers flexibility, reusability, and security for Azure Automation authentication. Unlike System-assigned MI, it’s not tied to the lifecycle of your Automation account, and unlike App Registrations, it doesn’t require secret management.
If your automation spans multiple resources, subscriptions, or even Automation accounts, UAMI is the most maintainable and secure option.
Discover more from CPI Consulting
Subscribe to get the latest posts sent to your email.